Applying Texture
Once you have made up your own texture with the ingredients I have specified you need to either keep the texture sealed until you want to use it or else apply it straight to your painting surface.
What to Apply it to
You can actually apply the texture to pretty much any surface that you would paint on including canvas, mdf (or other wood) or even to walls (as the texture mix is effectively a type of plaster).
You can apply the texture to the canvas as thinly or thickly as you like – I mostly use things like a cake slice or a home decorating scraper to apply the texture.

How to Apply it
If you use something with a really flat edge and apply it thinly then you can get an effects that looks a bit like fluffy clouds by just applying texture thinly and gently, scraping it over the canvas.
Otherwise you can apply the texture really thickly in random and messy chunks to get some good effects. I have lots of different implements that I use to make marks in the texture once I have applied it.
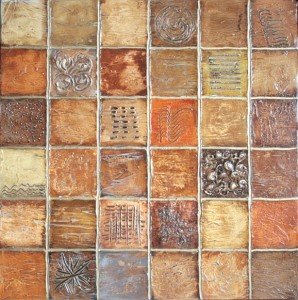
I also use the texture to apply a really smooth coat which I then mark through with kebab sticks to get grooved lines in. This is the method I use for my squares paintings which end up looking a bit like glassy tiles once I have also added a gloss varnish.
Adding Other Ingredients
You can add other ingredients to the texture like sand, wood shavings or rice. the list is pretty endless to be fair. Just make sure that if it is something that will decompose, it gets fully covered with the texture.

Drying Time
Although the texture can take a while to fully dry before you are able to paint it, it does start to form a skin relatively quickly.
For this reason, if you have a large canvas then you will need to work relatively quickly if you want to keep working the texture. You will probably only have about 15-20 minutes before the texture starts to form a skin and dry out. So in particular, if you want it to be quite smooth, then work in small patches at a time.
The texture can take a while to dry but it obviously depends on how thickly you apply the texture as to how long it will take – I usually wait overnight for it to dry. Try plenty of experimenting with different implements and thicknesses of the texture to see what kind of results you can get.

This is a painting that I created using a really thick texture base that was divided into squares with different effects being applied to each square.
The painting effects are those shown in the next page and one of the squares even has sea salt in with the texture.
I also used the gold powder that I love using in my paintings. You can find more info on that here.

SofiaJanuary 25, 2018 4:10 pm /
Hi there, I was going to post in one of your forums under "an example of my work" but are unable to. Can you help? I am a subscriber and love reading your blog 😀 Thank you so much for the texture recipe, I love working with plaster .